A laptop is built to move. A desk is where it often ends up working for hours. That is why a laptop desk setup needs a little more thought than putting the computer on a table and plugging things in. The screen, keyboard and trackpad are attached to one small body, so improving one position can make another less comfortable. The goal is simple: make the gear you touch all day easy to reach, keep the screen easy to see and leave enough clear space to work without fighting cables.
Start with the desk you already have. Measure the usable surface, not the room around it. Note where the power outlet is, where daylight comes from and whether you need to pack the setup away. Those details decide whether a laptop stand, compact keyboard, desk mat, light or charging station will make a real difference. A good setup is not the most crowded one. It is the one that lets you open the laptop, sit down and get going with fewer small annoyances.
Start with the screen and sitting position
Before buying anything, set your chair and screen relationship. OSHA computer workstation guidance recommends keeping the top of a monitor at or just below eye level, with relaxed shoulders, supported lower back and enough room for the keyboard and mouse. A laptop screen sits lower than most people need for extended desk work, but the answer is not to strain upward at a tall screen. Adjust the chair, screen and inputs together until your shoulders can stay relaxed.
For a laptop-only session, place the computer directly in front of you and increase the text size if you are leaning toward the display. For longer work, the CDC’s home workstation guidance suggests an external monitor when practical, roughly an arm’s length away with its top at or below eye level. It also notes that a separate keyboard and pointing device can be positioned independently from a laptop screen. That separation is the main advantage: you can raise the screen without pushing your hands too high.

Choose one of three laptop desk layouts
Most laptop desks work best when they commit to one layout instead of trying to do everything at once. Pick the layout that matches how long you sit there and how often you need to leave. You can add to it later, but begin with a stable base. A crowded desk with two screens, a full keyboard, a charging pile and no mouse space is harder to use than a simple layout with room to move.
Pick the layout that fits your day
- Laptop only: keep the laptop centered, use a clear mouse area beside it and reserve this layout for shorter sessions or frequent packing.
- Laptop on a stand: raise the screen, then add an external keyboard and mouse at desk height. This is the best compact upgrade for regular desk work.
- Laptop plus external monitor: use the larger screen as the primary display, keep the laptop to one side or below it, and make sure your keyboard and mouse stay centered to your main screen.
Do not assume a two-screen setup is automatically better. It earns its space when you compare documents, monitor a call while you work or keep a reference open all day. If your work is mostly one document, a browser and a few messages, a raised laptop with a compact keyboard can be calmer and easier to pack. Give the task more weight than the number of devices.
Raise the screen, then separate the inputs
A laptop stand is useful because it lets the screen move higher without turning the laptop keyboard into your only input. Once the screen is on a stable stand, place an external keyboard directly in front of you and keep the mouse close beside it. This keeps the screen and your hands from competing for the same height. If you use the laptop keyboard for a short task, lower the laptop again or accept that it is the short-session layout, not the all-day version.
Check the stand before you rely on it. It should sit flat, support the laptop without blocking its ports or vents, and stay stable when you open the lid and type nearby. An adjustable stand is helpful only if you will actually adjust it. A simple fixed riser can be better for a desk that stays in one place. For a temporary setup, a stable stack of books can raise the screen, but it still works best with a separate keyboard and mouse.

Keep the keyboard and mouse zone clear
Your keyboard and mouse deserve the most protected space on the desk because they are the items you use constantly. Keep the keyboard directly in front of the screen you use most. Put the mouse close enough that your upper arm does not have to reach out to the side. Move chargers, speakers, notebooks and decorative items out of that zone before you decide the desk is too small.
A desk mat can help define that working area, especially when the desk surface is uneven or slippery. It is not required, but it can keep a keyboard and mouse in a consistent position and protect the surface below. If you also want a place to charge a compatible phone, compare the actual size and charging placement of a wireless charging desk mat before treating it as a replacement for a separate charger. Your mouse still needs room to move.
Plan power before you add accessories
A clean desk does not mean hiding every cable. It means knowing what each cable does and routing it so it does not cross the place where you work. Start with the laptop charger, then add only the cables that have a job: a monitor connection, keyboard cable, mouse cable, light, hub or phone charger. Run longer cables toward the rear or side of the desk. Keep the connection you unplug most often easy to reach.
A USB-C hub can be useful when the laptop has limited ports, but check its power pass-through, display support and ports against the devices you already own. Do not buy a hub just because a desk photo has one. If you use a wireless charging pad or a 3-in-1 charging station, give it a deliberate home at the edge of the desk instead of placing it between the keyboard and mouse. Charging should remove friction, not create an obstacle.

Use lighting that helps the screen, not fights it
Put the screen perpendicular to a bright window when you can, rather than facing it or placing it directly in front of it. This reduces glare and avoids turning a video call into a silhouette. If your desk is in a dim corner, use a modest task light aimed at the desk, not a bright bulb reflecting off the screen. Adjust the laptop display brightness and text size before assuming you need more light.
For regular video calls, keep the camera near eye level and light your face from the front or slightly to one side. A compact clip-on light can help when the room changes through the day. The useful test is your own camera preview: if your eyes are clear and you do not see hard glare in glasses, stop adjusting. Our Laptop Ring Light Setup for Clearer Video Calls guide has the detailed placement routine when calls are a major part of your day.
Add audio only when it fits the desk
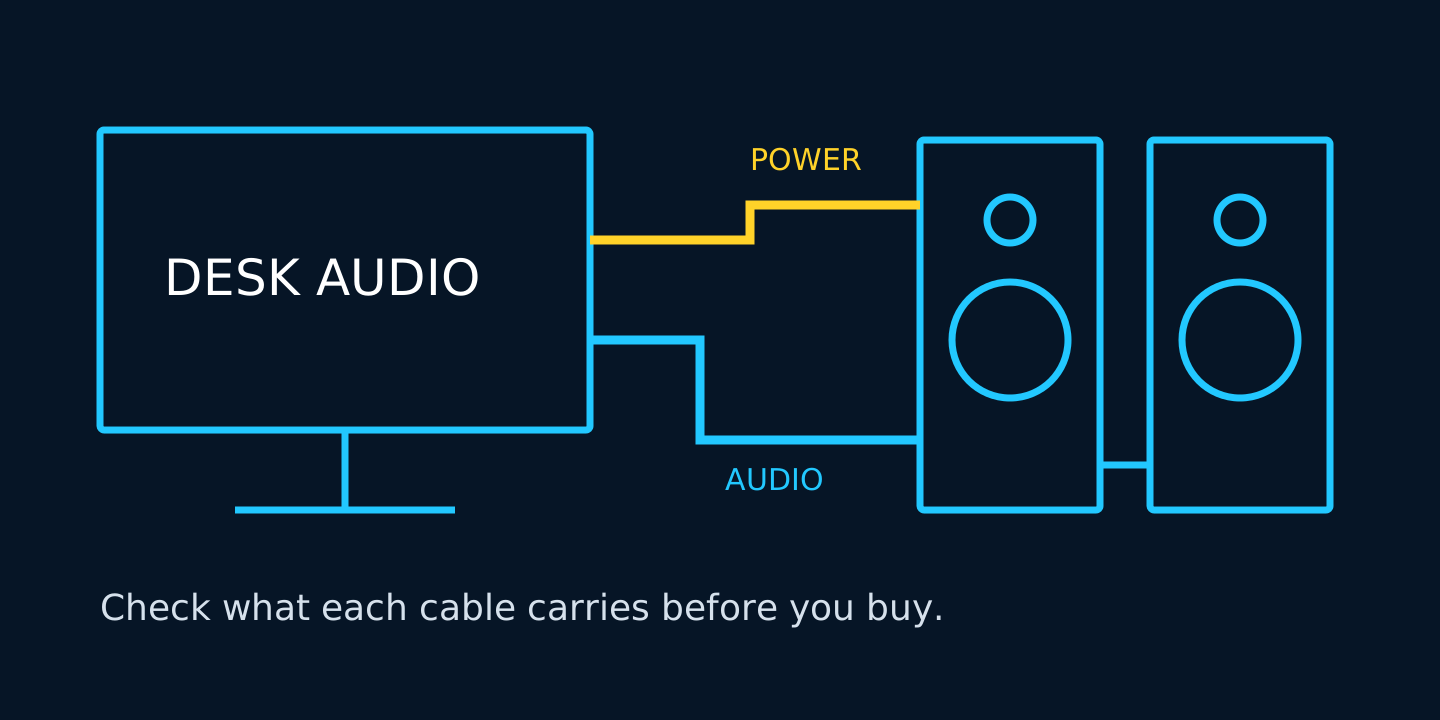
Sound can be the first thing that makes a laptop desk feel complete, but it should fit the way you work. Headphones keep sound private and are easy to put away. Small speakers can be useful for low-volume listening or calls when they do not take over the surface. If you choose USB-powered desk speakers, check whether USB handles power only or both power and audio before you buy. The cable count and connection type matter as much as the speaker size.
Place speakers to the left and right of your screen only if there is room for each to sit clear of the keyboard and mouse. On a narrow desk, a single compact speaker or headphones may be the more practical choice. Do not place speakers where their cable crosses your mouse path, and do not put a device that vibrates directly against a laptop stand. Small choices like these keep the desk usable after the novelty of new gear wears off.
A practical order for small desks
When desk space is tight, solve the repeat problem first. If you finish the day with a stiff neck, start with screen height and input separation. If you keep moving cables to use the mouse, clear the keyboard zone and route power. If calls look dim, fix the window position and add light only if the preview still needs it. This order prevents a familiar mistake: buying several accessories before the desk has a working layout.
| Problem | First move | Useful upgrade |
|---|---|---|
| Screen feels too low | Raise the laptop or add a monitor | Stable stand plus external keyboard and mouse |
| Mouse has no room | Clear the input zone | Desk mat sized for keyboard and mouse |
| Cables cross the desk | Route power toward the rear edge | Hub or charging station placed outside the mouse area |
| Calls look dark | Face the window or add soft front light | Clip-on laptop light |
| Phone and accessories spread everywhere | Give charging one fixed spot | Wireless charging desk mat or 3-in-1 charger |
Where NORYZO fits in
NORYZO’s desk setup collection is built around practical upgrades that solve a specific desk problem. The 75% Hot-Swap Mechanical Keyboard with RGB Backlight keeps the keyboard footprint smaller than a full-size board, while the RGB Gaming Mouse Pad with Wireless Charging can combine a larger mouse surface with a compatible phone-charging spot. A Clip-On Ring Light for Laptop and Monitor can help a call setup in a dim room. Check the current specifications, compatibility and dimensions before choosing what belongs on your desk.
Start with the layout, then add the one item that makes that layout easier to use. That is how a laptop desk stays clear, portable and comfortable instead of becoming a pile of accessories. If your laptop desk is also a gaming desk, use the Gaming Gear collection to compare the keyboard, mouse and lighting options that match the space you actually have.
Laptop desk setup questions
What do I need for a basic laptop desk setup?
Start with a stable desk, comfortable chair and clear screen position. For regular desk work, the most useful additions are usually a laptop stand, external keyboard and mouse. Add a light, hub or charging solution only when it solves a problem you have every day.
Should I put my laptop on a stand?
A stand is useful for longer sessions because it can bring the screen closer to eye level. Pair it with a separate keyboard and mouse so your hands can stay at a comfortable desk height. Make sure the stand is stable and does not block the laptop’s vents or ports.
How can I set up a laptop on a small desk?
Keep the laptop centered, protect a clear area for the keyboard and mouse, and run charging cables toward the back or side. Choose compact gear that solves a clear need. A raised laptop with a compact keyboard often uses space more effectively than adding several devices at once.
Do I need an external monitor for a laptop desk setup?
Not always. An external monitor helps when you need more screen space or use the desk for long sessions. For lighter work or a setup you pack away, a laptop stand with a separate keyboard and mouse may be enough. Choose the layout that matches your work, desk depth and available power.
Compare the current specifications, compatibility and prices in our desk setup collection and gaming gear collection before choosing your next upgrade.